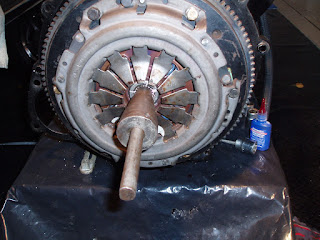
One of the neighbours in our street has a workshop & had an oxy torch. After taking it the first day, he returned confused about which way the ring gear should fit the flywheel. He was sure it should slide on the opposite way to which I had told him. After a bit of discussion and looking at the photos, he was correct. The side of the ring gear that engages the starter motor should be facing the transmission. Thank goodness I had not put in on the incorrect way!
Here are some pics of the flywheel & clutch back together.


Then comes the interesting part of putting the engine back in. The lifting it in is easily but aligning it to the gearbox is another story. Here are the photos of the engine going back in.


This time I used an engine levelling bar that I had bought some time ago as I thought it might assist in getting the angle of the engine just right for it to slide into the gearbox. I am not sure it helped very much as the winding mechanism broke & didn't allow much movement. After a fair bit of stuffing around & a bit of a push, it all went together. I quickly bolted the gearbox onto the bell housing. Then the next bit caused me a bit of grief. I couldn't align both of the engine mounts to fit. The left side went on OK but it took ages to get the RH side to fit. In the end, I undid the metal bracket bolted to the engine block, fitted it to the engine mount & then with some very careful lifting with the crane, managed to align the 4 bolts on the bracket back to the engine block. At last, all back together and all done by myself. I thought that was a bit of an achievement!
That was enough for day 1 so next day, I reconnected all the hoses, wires, exhaust manifold & radiator. That didn't take too long. I also added another earthing wire from the back of the engine to the firewall. Also, I fitted the reconditioned starter motor that I bought as mentioned in the previous post.
Now for the moment of truth! Will it start? After 3 goes, the engine fired and ran like a Swiss watch! That made me very happy, especially the fact that the starter motor engaged several times with no dramas. I just have to get some assistance to replace the bonnet & then we will be back on the road. I am happy it is all done but I don't want to have to do that too frequently. Here is a pic of it all back together.

No comments:
Post a Comment